
In my extensive experience with precision mechanical systems, the planetary roller screw (PRS) stands out as a critical component for converting rotational motion into linear actuation with high thrust, accuracy, and longevity. As a researcher focused on advancing transmission technologies, I have dedicated significant effort to refining the design and assembly processes for PRS, particularly the rollers, which are the most complex elements due to their dual-thread and gear features. This article presents a comprehensive, first-person account of my developed methodology for roller design and virtual assembly, aiming to provide a detailed guide for engineers and designers working with planetary roller screw systems. I will delve into the intricate matching between thread and gear parameters, outline step-by-step design workflows, and demonstrate virtual modeling and assembly techniques using modern CAD tools, all while emphasizing the importance of the planetary roller screw in high-performance applications.
The planetary roller screw mechanism is renowned for its superior load capacity and stiffness compared to traditional ball screws, primarily because all roller threads engage simultaneously, distributing stress across multiple contact points. In my work, I have observed that the roller’s structure—integrating both a threaded section and end gears—poses unique design challenges. Ensuring proper meshing between the roller threads and the screw/nut threads, while simultaneously maintaining correct gear engagement with the internal ring gear, requires a meticulous parametric matching approach. My methodology addresses this by breaking down the roller design into three coherent stages: pitch diameter matching, end gear design, and thread profile design. Each stage is supported by analytical formulas and validated through virtual prototyping, which I will elaborate on in the following sections.
To begin, let me outline the fundamental kinematics of a planetary roller screw. The system consists of a central screw, multiple rollers arranged planetarily, a nut, an internal ring gear, and a carrier. When the screw rotates, the rollers undergo planetary motion—combining revolution around the screw axis and rotation about their own axes—transmitting motion to the nut for linear translation. The geometric relationships are governed by key parameters, which I derive from basic principles. For instance, the ratio of screw pitch diameter to roller pitch diameter is denoted as \( k \), and it directly influences the thread lead and gear teeth counts. Specifically, the number of screw thread starts \( n_s \) relates to \( k \) as:
$$ n_s = k + 2 $$
Similarly, the teeth counts of the internal ring gear \( Z_n \) and roller end gear \( Z_r \) must satisfy:
$$ Z_n = (k + 2) Z_r $$
These equations form the foundation for my design process, ensuring kinematic compatibility within the planetary roller screw assembly. In practice, I start by defining the screw parameters based on application requirements such as thrust force and speed. From there, I compute the roller pitch diameter \( d_r \) using the relationship:
$$ d_r = \frac{d_s}{k} $$
where \( d_s \) is the screw pitch diameter. This initial matching is crucial for subsequent steps, as it sets the scale for both the gear and thread dimensions on the roller.
| Parameter | Symbol | Relationship or Formula | Typical Value Range |
|---|---|---|---|
| Screw Pitch Diameter | \( d_s \) | Determined from load requirements | 10–50 mm |
| Roller Pitch Diameter | \( d_r \) | \( d_r = d_s / k \) | 3–15 mm |
| Ratio Factor | \( k \) | \( k = n_s – 2 \) | 3–10 |
| Screw Thread Starts | \( n_s \) | \( n_s = k + 2 \) | 5–12 |
| Roller Gear Teeth | \( Z_r \) | Based on pitch diameter and module | 15–30 |
| Internal Ring Gear Teeth | \( Z_n \) | \( Z_n = (k + 2) Z_r \) | 80–200 |
| Module of End Gear | \( m \) | \( m = d_r / Z_r \) | 0.2–0.5 mm |
Moving to the second stage—designing the end gears of the roller—I focus on ensuring that the gear pitch circle coincides with the roller pitch diameter. This alignment is vital for maintaining parallelism between the roller and screw axes during operation. The gear pitch diameter \( d \) is set equal to \( d_r \), expressed as:
$$ d = d_r = m Z_r $$
where \( m \) is the gear module and \( Z_r \) is the number of teeth on the roller end gear. Selecting appropriate values for \( m \) and \( Z_r \) involves checking for gear undercutting, which can weaken the tooth root. The minimum teeth count to avoid undercutting, \( Z_{\text{min}} \), is given by:
$$ Z_{\text{min}} = \frac{2h_a^*}{\sin^2 \alpha_n} $$
Here, \( h_a^* \) is the addendum coefficient (typically 1 for full-depth teeth) and \( \alpha_n \) is the pressure angle (usually 20°). In my design iterations, I follow a decision flow: if \( Z_r > Z_{\text{min}} \), the gear parameters are acceptable; if \( Z_r < Z_{\text{min}} \), I either adjust \( Z_r \) and \( m \) or apply profile shifting with a shift coefficient \( x_{\text{min}} \) calculated as:
$$ x_{\text{min}} = \frac{14 – Z_r}{17.5} $$
This ensures robust gear geometry. Subsequently, I compute the addendum diameter \( d_a \), dedendum diameter \( d_f \), and center distance \( a \) for the gear pair. The roller’s end gear must mesh seamlessly with the internal ring gear, and I often use a table to summarize these derived dimensions for multiple design variants, as shown below.
| Parameter | Value (Case Study) | Units |
|---|---|---|
| Roller Pitch Diameter \( d_r \) | 5.0 | mm |
| Gear Teeth \( Z_r \) | 20 | – |
| Module \( m \) | 0.25 | mm |
| Addendum Coefficient \( h_a^* \) | 0.8 | – |
| Dedendum Coefficient \( c^* \) | 0.3 | – |
| Pressure Angle \( \alpha_n \) | 20 | degrees |
| Addendum Diameter \( d_a \) | 5.4 | mm |
| Dedendum Diameter \( d_f \) | 4.45 | mm |
| Center Distance \( a \) | 15.0 | mm |
The third stage involves designing the roller thread profile. A critical requirement is that the thread major diameter \( d’ \) equals the gear addendum diameter \( d_a \) to ensure full engagement with the screw and nut threads. Additionally, to prevent axial displacement of the roller during operation—which could cause gear teeth to jam into the nut threads—the thread height \( h \) must be greater than or equal to the gear tooth height \( h’ \). In my designs, I prefer a circular arc profile for the thread flank to promote point contact, reducing friction and wear. The arc radius \( R \) is determined by:
$$ R = \frac{d_r}{2 \sin 45^\circ} $$
This yields a radius that aligns with the roller pitch diameter and a 45° contact angle, optimizing load distribution. The thread pitch \( p \) is consistent with the screw and nut, typically set to 2 mm for fine transmission. By integrating these parameters, I define the thread cross-section, which can be modeled in CAD software for further analysis.
To synthesize the entire roller design process, I have developed a flowchart that encapsulates the decision-making steps. While I cannot include visual diagrams per the guidelines, I describe it textually: First, determine \( d_s \), \( n_s \), and \( p \) from specifications; then compute \( d_r \) and \( k \). Next, select \( Z_r \) and \( m \) for the end gear, checking against \( Z_{\text{min}} \) to avoid undercutting—if needed, iterate or apply profile shifting. After finalizing gear dimensions, set the thread major diameter equal to \( d_a \), and calculate the arc radius \( R \) for the thread profile. This systematic approach ensures that all components of the planetary roller screw are harmonized, a testament to the precision required in such systems.
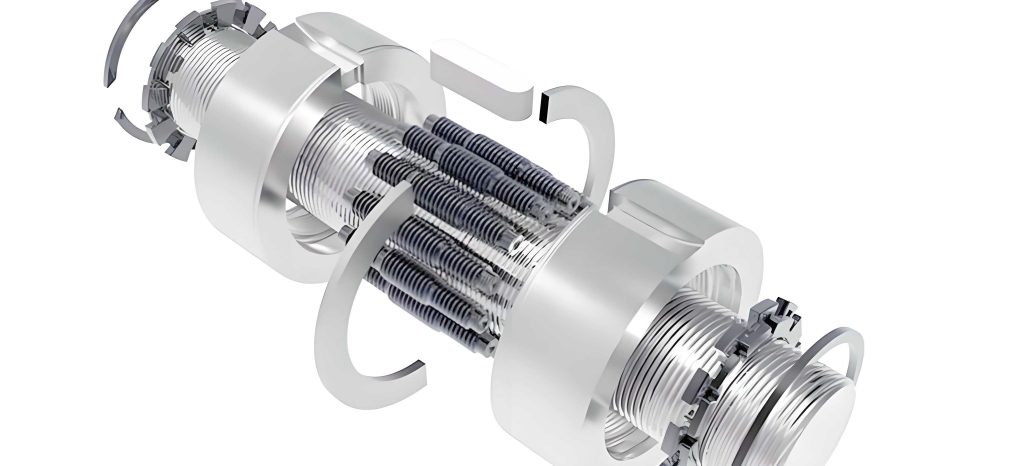
Transitioning to virtual modeling, I employ SolidWorks for creating 3D models of the planetary roller screw components. The roller, with its combined thread and gear features, presents modeling challenges. My strategy involves using sweep-cut operations along helical paths to generate the threads. For the screw and nut, which have multi-start threads, I first create a single thread with a lead equal to the pitch multiplied by the number of starts, then array it circumferentially. The thread cross-section is defined as a trapezoidal shape with a 90° included angle for the screw and nut, while for the roller, I use a circular arc profile centered on the roller axis. Key dimensions, such as thread minor diameter and crest width, are adjusted to prevent interference during assembly; for instance, I typically set a crest width of 0.2625 mm and a flank thickness of 0.6 mm, fine-tuning as needed based on virtual interference checks.
For the roller end gears, I extrude gear teeth profiles based on the calculated parameters. A crucial aspect is aligning the gear tooth centerline with the thread start point to ensure proper meshing in assembly. I establish reference planes in the CAD model: one plane through the helix start point on the nut (plane \( a \)) and another through the gear tooth center on the roller (plane \( b \)). By setting these planes coincident during assembly, I guarantee that both gear and thread engagements are synchronized. This alignment is fundamental for the planetary roller screw functionality, as any misalignment could lead to binding or premature wear.
Now, let me detail the virtual assembly methodology for the planetary roller screw. Assuming \( N \) rollers distributed evenly around the screw, the angular spacing between rollers is \( \phi_c = 360^\circ / N \). The assembly process simulates the planetary motion: each roller undergoes revolution (around the screw) and rotation (about its own axis). I start by assembling the first roller to the nut, aligning plane \( b \) with plane \( a \). Then, for the remaining rollers, I account for their revolutionary positions. The revolutionary angle \( \theta_i \) for the \( i \)-th roller is:
$$ \theta_i = (i – 1) \phi_c $$
where \( i = 1, 2, \dots, N \). Correspondingly, due to the thread lead relationship, the rotational angle \( \beta_i \) for each roller is:
$$ \beta_i = n_s \theta_i $$
All angles are reduced modulo 360° to practical ranges. Interestingly, when \( N = n_s \), \( \beta_i \) becomes multiples of 360°, simplifying the assembly to a circular pattern. In practice, I add \( N \) reference planes on the nut at intervals of \( \phi_c \), then mate each roller’s plane \( b \) to the corresponding nut plane, adjusting the angular offset by \( \beta_i \) to account for rotation. This ensures correct thread and gear meshing simultaneously. After all rollers are assembled, I add the internal ring gear, carrier, and retainer rings to complete the planetary roller screw assembly.
| Roller Index \( i \) | Revolutionary Angle \( \theta_i \) (degrees) | Rotational Angle \( \beta_i \) (degrees) | Adjusted \( \beta_i \) (mod 360°) |
|---|---|---|---|
| 1 | 0 | 0 | 0 |
| 2 | 72 | 360 | 0 |
| 3 | 144 | 720 | 0 |
| 4 | 216 | 1080 | 0 |
| 5 | 288 | 1440 | 0 |
This table illustrates a specific case where \( N = 5 \) and \( n_s = 5 \), resulting in zero net rotational adjustment, allowing for a simple circular array. For other configurations, the angles would differ, and I compute them accordingly. The virtual assembly not only validates the design but also identifies potential interferences, which I rectify by tweaking thread dimensions—for example, increasing the root clearance or adjusting the flank angle. This iterative process is essential for achieving a functional planetary roller screw model.
Throughout my work, I emphasize the importance of the planetary roller screw in applications like aerospace, robotics, and high-precision machinery. The design methodology I present here enhances reliability and performance by ensuring parametric harmony between threads and gears. Virtual modeling and assembly, as I demonstrate, reduce prototyping costs and accelerate development cycles. For instance, by using CAD tools, I can simulate load distribution and contact stresses, further optimizing the roller profile for longevity. The circular arc thread design, coupled with precise gear matching, minimizes friction and maximizes efficiency, key advantages of the planetary roller screw system.
In conclusion, my first-hand experience with planetary roller screw design has led to a robust methodology that integrates analytical calculations with virtual prototyping. The three-stage roller design process—pitch diameter matching, end gear design, and thread profiling—ensures kinematic correctness and structural integrity. The virtual assembly technique, based on revolutionary and rotational angles, guarantees proper meshing in the planetary roller screw assembly. I have found that attention to details like gear undercutting and thread interference is crucial for success. Future work may involve dynamic simulation and fatigue analysis, but the foundation laid here provides a comprehensive guide for engineers. As the demand for high-performance linear actuators grows, the planetary roller screw will continue to be a pivotal technology, and I am confident that this design and assembly approach will facilitate its advancement.
To reiterate, the planetary roller screw is a marvel of mechanical engineering, and through meticulous design and virtual validation, we can unlock its full potential. I encourage practitioners to adopt these methods, experiment with parameters, and leverage CAD tools to innovate further. The journey from concept to virtual model is both challenging and rewarding, and I hope my insights contribute to the broader community working with planetary roller screw systems.