
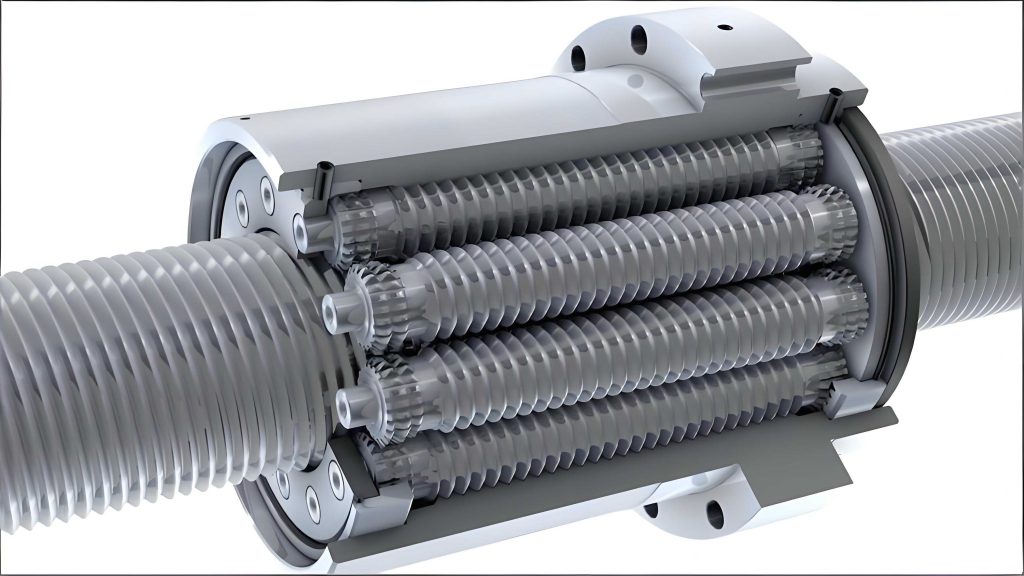
In my work on precision linear actuators, I have focused extensively on the Planetary Roller Screw mechanism. This remarkable device converts rotary motion into linear motion with exceptional efficiency, high load capacity, and outstanding reliability. Among its variants, the Recirculating Planetary Roller Screw Mechanism is particularly intriguing for applications requiring small leads, compact spaces, and high precision. Its defining feature is the presence of a threadless zone within the nut, which allows the rollers to recirculate and reset their position relative to the screw threads. This article details my approach to designing the critical components of such a mechanism, with a special emphasis on the nut’s threadless zone, and presents a systematic virtual assembly methodology.
The core components of a Circulating Planetary Roller Screw include the screw, the planetary rollers, the nut with its integral threadless section, cam rings, and a carrier (or retainer). The working principle is elegant: as the screw rotates, it drives the rollers, which both spin on their own axes and revolve around the screw axis. The rollers engage with the internal threads of the nut via their own thread-like grooves, causing the nut to translate linearly. When a roller reaches the end of the nut’s threaded section, it enters the threadless zone. Here, a cam ring profile lifts the roller radially, allowing it to “step over” the crest of the screw thread. It is then guided back into the threaded zone on the opposite side, enabling continuous, uninterrupted motion.
1. Foundational Design Principles and the Threadless Nut Zone
The design process begins with establishing the fundamental geometric relationships that ensure proper concentricity and kinematic compatibility between the screw, rollers, and nut. The screw and nut must have the same hand, the same number of starts, and an identical pitch. Their differing pitch diameters, however, result in different lead angles.
The concentricity condition is paramount:
$$ d_n = d_s + 2d_r $$
where \(d_n\), \(d_s\), and \(d_r\) are the pitch diameters of the nut, screw, and roller, respectively. The kinematic conditions are:
$$ n_s = n_n $$
$$ P_s = P_n $$
$$ \lambda_s = \arctan\left(\frac{n_s P_s}{\pi d_s}\right) > \lambda_n = \arctan\left(\frac{n_n P_n}{\pi d_n}\right) $$
where \(n\) denotes the number of starts, \(P\) the pitch, and \(\lambda\) the lead angle.
The most critical and distinctive aspect of designing a Circulating Planetary Roller Screw is the nut’s threadless zone. This zone is not merely an absence of threads; it is a precisely machined profile that guides the roller during its recirculation cycle. My design method for this zone is based on analyzing the trajectory of the roller’s center of mass as it is lifted by the cam ring.
The radial journey of a roller during recirculation can be broken down into key positions, which define the profile of the threadless zone in the nut. The goal is to create a smooth path that prevents jamming and ensures the roller re-engages correctly.
| Parameter | Symbol | Description |
|---|---|---|
| Maximum Roller Radial Lift | \(h_r\) | The radial distance the roller center must move to clear the screw thread crest. |
| Radius of Nut Threadless Zone (Mid-section) | \(R_{r1}\) | The inner radius of the nut in the central part of the threadless zone, accommodating the lifted roller. |
| Recirculation Angle | \(\beta\) | The angular span over which the roller’s center travels during the recirculation lift and return. |
The maximum radial lift \(h_r\) is determined by the major diameters of the screw and roller:
$$ h_r = \frac{d_{r3} – d_r}{2} + \frac{d_{s3} – d_s}{2} $$
where \(d_{r3}\) and \(d_{s3}\) are the major diameters of the roller and screw.
The radius of the nut’s threadless zone profile \(R_{r1}\) must be large enough to accommodate the roller when its center is at its highest point. It is derived from the roller’s pitch radius plus its lift and half its major diameter:
$$ R_{r1} = \frac{d_s}{2} + d_r + h_r = \frac{d_s}{2} + d_r + \frac{d_{r3} – d_r}{2} + \frac{d_{s3} – d_s}{2} $$
The nut’s threadless profile is typically composed of three contiguous arcs. The central arc, with radius \(R_{r1}\), spans an angular width of \(2\beta\) to accommodate both forward and reverse motion. The recirculation angle \(\beta\) is a function of the screw’s geometry and the thread angle (\(\alpha\)):
$$ \beta = \frac{P_s \cdot 360^\circ}{\pi d_c \cdot \tan(\alpha/2)} $$
where \(d_c\) is the diameter of the roller’s orbital path around the screw (\(d_c = d_s + d_r\)).
This angle \(\beta\) is constrained by the need to fit between adjacent rollers. With \(N\) rollers evenly spaced by an angle \(\varphi = 360^\circ / N\), we must have \(\beta < \varphi/2\). This imposes a limit on the number of rollers based on the screw’s pitch and diameter:
$$ N < \frac{\pi d_c \tan(\alpha/2)}{P_s} $$
This is a crucial design trade-off: a finer pitch or a smaller diameter limits the number of rollers that can be practically employed in the planetary roller screw assembly.
2. Thread Profile Matching and Component Design
In a standard planetary roller screw, the rollers have full threads. In the circulating type, the rollers feature axial “grooves” that act as thread segments. Achieving proper point contact between these roller grooves and the screw/nut threads requires careful profile matching. The screw and nut have a standard triangular thread profile (e.g., 60°). The roller’s profile, however, is modified.
I design the roller groove profile with a circular arc on its flanks. The radius of this arc \(R_{r2}\) is chosen relative to the roller’s pitch diameter to approximate a point contact condition:
$$ R_{r2} = \frac{d_r}{2 \sin(45^\circ)} $$
During modeling, the precise profile is defined in a cross-section sketch. A critical step is to ensure there is no interference. This is done by carefully controlling the gap between the roller’s circular flank and the straight flank of the screw/nut thread, and by ensuring the crests and roots of the parts have sufficient clearance. Small adjustments to the profile triangle’s position and the arc radius are made until a clean,干涉-free meshing is achieved in the virtual model.
| Component | Profile Characteristic | Key Design Consideration |
|---|---|---|
| Screw | Standard triangular thread (straight flanks). | Lead angle is larger than the nut’s. Start point phase is critical for assembly. |
| Nut | Standard triangular thread with a threadless zone. | The transition from threaded to threadless zone must be smooth. The threadless zone profile is defined by \(R_{r1}\) and \(\beta\). |
| Roller | Axial grooves with circular arc flanks. | Arc radius \(R_{r2}\) is chosen for point contact. Profile must be checked for interference with both screw and nut. |
3. Carrier and Cam Ring Design
The carrier holds the rollers, maintaining their angular spacing and ensuring they only rotate and revolve, without unwanted tilting. It typically has straight slots with semi-circular ends. The diameter of these semi-circles must match the roller’s major diameter \(d_{r3}\). The carrier’s outer diameter \(D_B\) must be less than the nut’s minor diameter \(d_{n1}\) but greater than the sum of the screw major diameter and roller minor diameter to contain the rollers:
$$ d_{s3} + d_{r1} < D_B < d_{n1} $$
The length of the slot \(l_b\) must accommodate the full axial travel of the roller during its normal engagement and its stepped position during recirculation:
$$ l_b = 2R_b + 2n_s P_s + s_1 + s_2 $$
where \(R_b = d_{r3}/2\) is the slot end radius, and \(s_1\), \(s_2\) are axial clearances.
The cam rings are the key to recirculation. Their internal profile features a raised “bump” or cam lobe. The angular width of this lobe corresponds to the recirculation angle \(\beta\). Its axial length is exactly one lead of the screw (\(n_s P_s\)), providing a full-helix ramp to guide the roller. The cam lobe’s working surface is angled at \(\alpha/2\) to match the thread flank angle, ensuring positive contact with the roller groove during the lift phase. The cam ring’s inner diameter must clear the screw’s major diameter, and its lobe’s outer radius must fit within the nut’s bore.
4. Virtual Modeling and a Step-by-Step Assembly Methodology
Based on the derived formulas, I create detailed 3D models. The table below summarizes example design parameters used for a model.
| Parameter | Screw | Roller | Nut |
|---|---|---|---|
| Major Diameter (mm) | 32.68 | 8.18 | 47.80 |
| Pitch Diameter (mm) | 32.00 | 7.50 | 47.00 |
| Minor Diameter (mm) | 31.20 | 6.70 | 46.32 |
| Number of Starts | 1 | – | 1 |
| Pitch (mm) | 1.0 | – | 1.0 |
| Thread Angle | 60° | 60° | 60° |
| Number of Rollers (N) | – | 12 | – |
Modeling involves creating helical sweep cuts for the screw and nut threads, and revolution cuts/linear patterns for the roller grooves. Special attention is paid to the start phases of the screw and nut threads. To ensure all rollers mesh simultaneously without conflict, I align the screw thread start point and the nut thread start point in the same axial plane during the modeling phase. This involves creating reference planes at specific axial offsets related to integer multiples of the pitch.
The virtual assembly of the Circulating Planetary Roller Screw is non-trivial due to the phased axial positions of the rollers. I have developed a reliable, step-by-step assembly sequence:
| Step | Action | Key Constraint / Formula |
|---|---|---|
| 1 | Orient Components. | Determine screw/nut hand (right/left). Position cam rings accordingly. |
| 2 | Assemble first cam ring to nut. | Align the cam lobe’s center plane with one side of the nut’s threadless zone. |
| 3 | Insert carrier. | Align one carrier slot center with the cam lobe center. |
| 4 | Assemble second cam ring. | Its lobe must be on the opposite side of the threadless zone, offset by the roller spacing angle \(\varphi\). |
| 5 | Insert Rollers Sequentially. | Each roller (i=1 to N) is placed in its slot. Its axial position is uniquely defined by the distance \(l_i\) from its central plane to the first cam ring’s face: $$ l_i = m + s_1 + \frac{N – i}{N} P_s $$ where \(m\) is a fixed offset. This staggers the rollers perfectly for recirculation. |
| 6 | Insert Screw. | The screw’s thread start phase, pre-aligned during modeling, now ensures correct meshing with all staggered rollers simultaneously. |
This methodology ensures that when the first roller is just entering the recirculation zone, the roller diametrically opposite is perfectly engaged in the threads, and all others are in their correct phased positions, guaranteeing smooth load transfer and motion continuity in the virtual planetary roller screw assembly.
5. Conclusion
In this article, I have presented a comprehensive design and virtual assembly framework for the Circulating Planetary Roller Screw mechanism. The core contribution is a systematic design method for the nut’s threadless zone, deriving formulas for its key parameters \(R_{r1}\) and \(\beta\), and linking them to the fundamental constraint on the number of rollers. Furthermore, I detailed the thread profile matching process to prevent interference and described the design logic for the carrier and cam rings. Finally, I provided a proven, step-by-step virtual assembly sequence that accounts for the critical axial phasing of the rollers. This integrated approach, from theoretical design to practical virtual assembly, provides a valuable reference for engineers and researchers developing high-performance Circulating Planetary Roller Screw systems for demanding applications in aerospace, robotics, and precision machinery.