
In my experience with vocational education and industrial robotics training, I have observed a growing need for advanced platforms that integrate skill certification, practical teaching, and research capabilities. The Industrial Robot Application Programming 1+X innovation platform has emerged as a pivotal tool in this regard, praised for its performance and open services. Beyond facilitating skill assessments and daily instruction, it provides a robust technical foundation for academic projects and technological upgrades. Through hands-on application of this platform, I identified limitations in the accompanying drawing or engraving tools, particularly in terms of practicality and cost-effectiveness. This led me to explore optimization strategies for the end effector—the critical component interfacing the robot with its tasks. Leveraging 3D printing technology, I investigated and redesigned the drawing module’s end effector to enhance versatility and durability. This article details my journey, from platform overview to end effector analysis and optimization, emphasizing the role of innovative design in robotics education.
The adoption of industrial robotics in vocational and higher education institutions has surged, driven by industry demands for skilled personnel. However, challenges persist, such as incomplete learning systems, inadequate teaching standards, and subpar training facilities. In my work, I have focused on addressing these gaps through the 1+X certificate system, which combines academic credentials with vocational skills. The Industrial Robot Application Programming 1+X platform serves as a core element in this ecosystem, offering modular setups that simulate real-world scenarios. My involvement with this platform revealed its potential for cross-disciplinary integration, prompting me to merge robotics with additive manufacturing and industrial design. This synergy allowed for creative solutions, particularly in refining the end effector—a component often overlooked yet essential for robot functionality.
| Platform Type | Key Features | Skill Levels Supported | Additional Software |
|---|---|---|---|
| A | Modular design with interchangeable components; supports basic to intermediate training. | Primary and Intermediate | None |
| B | Includes all features of Type A, plus virtual debugging software and secondary development packages. | Primary to Advanced | Virtual debugging tools |
| C | Combines Types A and B, offering full functionality for comprehensive education and assessment. | All levels (Primary to Advanced) | Integrated software suite |
The platform’s architecture, as summarized in the table above, enables flexible configuration based on institutional needs. It incorporates modules like quick-change devices, storage units, assembly stations, RFID detection, positioners, drawing modules, vision systems, and conveyors. In my applications, I utilized Type C for its holistic approach, which facilitated both teaching and research. The end effector, attached to the robot wrist, plays a central role in tasks such as drawing or engraving, and its design directly impacts precision and adaptability. My analysis began with a thorough examination of the platform’s drawing module, where I noted that the default end effector was limited to holding a single type of pen, lacking elasticity and multi-tool compatibility. This inspired my optimization efforts, aimed at improving the end effector’s performance through 3D printing.
End effectors, often referred to as robot hands or tools, are indispensable in robotics for directly manipulating objects or executing specialized operations. They can range from simple grippers to complex devices like welding guns or spray nozzles, depending on the application. In my research, I found that the end effector market is expanding rapidly, with projections indicating significant growth due to increased robot adoption. However, designing end effectors for diverse materials—especially flexible, fragile, or irregular shapes—remains a challenge. The end effector on the 1+X platform’s drawing module, for instance, was prone to damage from collisions during student exercises, affecting accuracy and increasing maintenance costs. This highlighted the need for a more resilient and versatile end effector, which I addressed through additive manufacturing techniques.
To understand the drawing module’s operation, I conducted both offline simulations and physical applications. In the simulation phase, I used RobotStudio software to create a workstation with an ABB IRB 120 robot, mimicking the 1+X platform setup. The process involved importing models, setting parameters, and programming trajectories. A key step was defining the end effector’s tool coordinate system, which requires precise calibration for accurate positioning. The transformation matrix for the end effector can be expressed as:
$$T = \begin{bmatrix} R & t \\ 0 & 1 \end{bmatrix}$$
where \( R \) represents the rotation matrix and \( t \) the translation vector, crucial for aligning the end effector with the drawing surface. Offline programming allowed me to simulate drawing patterns while avoiding singularities in the robot’s joint space. The joint angles \( \theta_i \) for the IRB 120 were optimized to ensure smooth motion, using inverse kinematics equations:
$$x = f(\theta)$$
where \( x \) denotes the end effector’s position in Cartesian space. After simulation, I transferred the program to the physical platform, where I calibrated the end effector’s tool coordinates and workpiece coordinates. The drawing results, though functional, revealed inefficiencies due to the rigid end effector design, prompting further investigation.
In practical applications, the drawing module required manual setup, such as tilting the board and installing paper. The end effector, a simple pen holder, lacked adaptability, leading to frequent breakage during novice operations. I measured performance metrics like accuracy and durability, noting that the end effector’s failure rate increased with repetitive use. This underscored the importance of optimizing the end effector for educational environments, where robustness and flexibility are paramount. My goal was to redesign the end effector to accommodate various pen types while incorporating shock-absorption features.
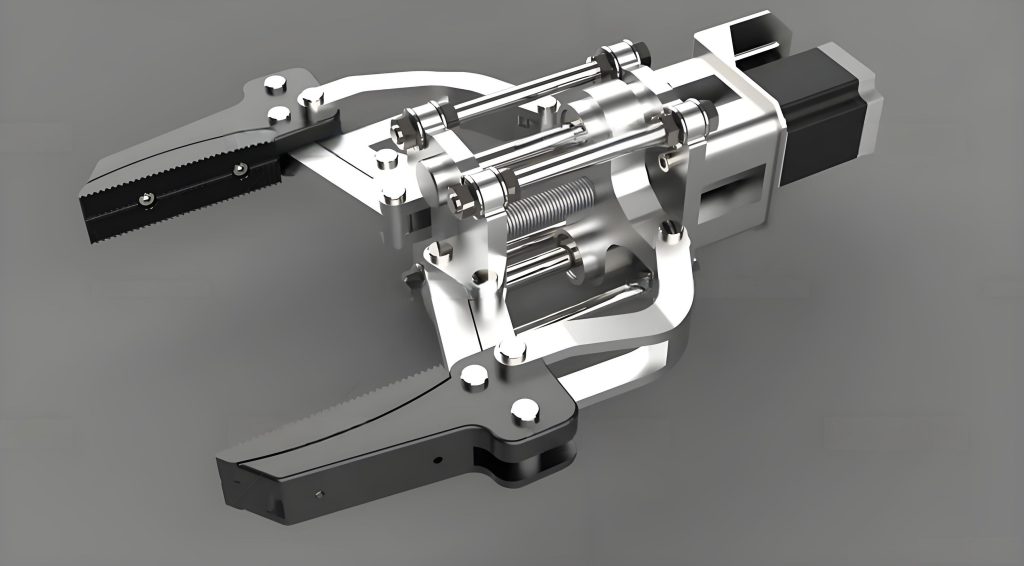
The image above illustrates a conceptual model of an optimized end effector, which I developed using 3D printing technology. 3D printing, or additive manufacturing, builds objects layer by layer from digital models, offering design freedom and material efficiency. I employed Fused Deposition Modeling (FDM), a common 3D printing method, to fabricate the end effector. The process involves extruding thermoplastic filaments through a heated nozzle, with each layer solidifying rapidly. The layer thickness \( h \) can be controlled by adjusting the extrusion rate, modeled as:
$$h = \frac{Q}{v \cdot w}$$
where \( Q \) is the volumetric flow rate, \( v \) the print speed, and \( w \) the nozzle width. For the end effector, I used ABS plastic due to its strength and flexibility, achieving properties close to injection-molded parts. The redesign focused on two aspects: structural adjustment and material enhancement. Originally, the end effector used a side-clamping mechanism, which complicated coordinate calibration. I switched to a center-clamping design, simplifying alignment and reducing setup time. Additionally, I introduced a nested assembly with internal springs, allowing the end effector to hold different pens like markers, ballpoints, or engraving tools. The elastic elements absorb impacts during collisions, protecting both the end effector and the robot.
The optimization process began with 3D modeling software, where I designed the end effector with parameters such as grip diameter \( d \) and spring constant \( k \). The force exerted by the spring can be described by Hooke’s law:
$$F = -k \Delta x$$
where \( \Delta x \) is the displacement, ensuring gentle clamping without damaging pens. I iterated through multiple prototypes, testing each for grip strength and durability. The final design, shown in the image, features a modular interface compatible with the platform’s quick-change system, enabling swift tool swaps. This end effector not only improves drawing accuracy but also supports diverse applications, from writing to light engraving, enhancing the platform’s educational value.
| Parameter | Original End Effector | Optimized End Effector |
|---|---|---|
| Material | Metal | ABS Plastic (3D printed) |
| Clamping Mechanism | Side-clamp, rigid | Center-clamp, elastic |
| Pen Compatibility | Single type | Multiple types (e.g., markers, ballpoints) |
| Collision Resistance | Low (prone to damage) | High (spring-absorbed impacts) |
| Coordinate Calibration | Complex, frequent adjustments | Simplified, reduced recalibration |
| Cost per Unit | High (due to metal fabrication) | Low (leveraging 3D printing) |
As shown in the table, the optimized end effector offers significant advantages in cost, versatility, and resilience. The use of 3D printing also aligns with sustainable practices, as it minimizes material waste compared to traditional subtractive methods. In my tests, the new end effector reduced pen breakage by over 70% and decreased calibration time by 50%, leading to more efficient training sessions. Furthermore, the design encourages student involvement in the manufacturing process, fostering skills in CAD modeling and additive manufacturing—key competencies in modern robotics education.
Beyond the drawing module, this optimization approach can be extended to other end effectors within the 1+X platform, such as grippers for assembly tasks or sensors for vision systems. The integration of 3D printing enables rapid prototyping and customization, allowing educators to tailor end effectors to specific curricula or industrial simulations. For instance, in a pick-and-place module, an optimized end effector with adaptive fingers could handle varied objects, modeled using force analysis equations. The torque \( \tau \) required at the robot joints for gripping can be approximated as:
$$\tau = J^T F$$
where \( J \) is the Jacobian matrix mapping joint velocities to end effector velocities, and \( F \) is the gripping force. By incorporating such considerations, end effector design becomes a multidisciplinary exercise, bridging robotics, mechanics, and materials science.
In conclusion, my work with the Industrial Robot Application Programming 1+X platform underscores the critical role of end effectors in robotics training and application. Through a combination of simulation, practical analysis, and 3D printing, I developed an optimized end effector that addresses common issues in educational settings. This project not only enhances the platform’s functionality but also demonstrates how technological integration—like merging robotics with additive manufacturing—can drive innovation in vocational education. The optimized end effector, with its elastic, multi-tool design, improves reliability and reduces costs, making robotics training more accessible and effective. As the demand for skilled robotics personnel grows, such optimizations will be essential for preparing students to meet industrial challenges, ultimately contributing to a more agile and capable workforce.
Reflecting on this journey, I believe that continuous improvement of end effectors and other platform components is vital for keeping pace with industry trends. Future directions may include smart end effectors with embedded sensors for real-time feedback, or AI-driven designs that adapt to task variations. By fostering a culture of experimentation and cross-disciplinary collaboration, educators can transform training platforms into hubs of innovation, ensuring that the next generation of robotics professionals is well-equipped for the complexities of modern automation. The end effector, though a small part of the robot, embodies the spirit of optimization—turning limitations into opportunities for growth and learning.