
In modern aerospace manufacturing, automated assembly systems have become pivotal for enhancing precision and efficiency. Among these systems, the robot-based flexible assembly platform relies heavily on specialized tools, with the end effector serving as a critical component for hole-making tasks. The design and functionality of this end effector directly influence the quality of holes drilled in aircraft components, such as wings or fuselage panels. In this article, I present a comprehensive design and simulation study of a hole-making end effector tailored for robotic applications. The focus is on achieving high precision in normal direction alignment, countersink depth control, and integrated drilling-countersinking operations, all while maintaining structural compactness and reliability. Through detailed unit-wise design, mathematical modeling, and digital simulation, this work aims to validate the feasibility and robustness of the proposed end effector, contributing to advancements in automated aerospace assembly.
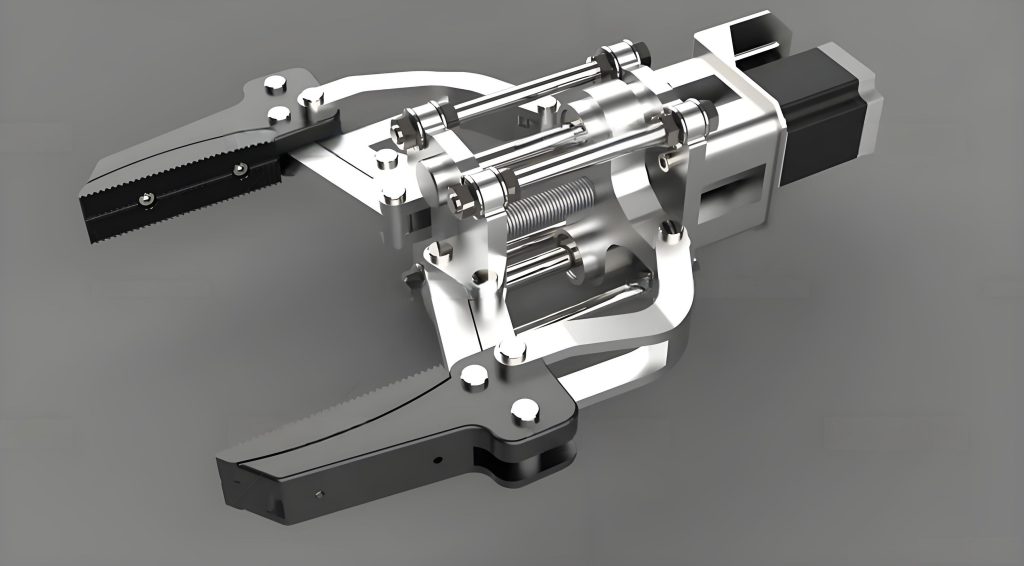
The end effector is designed as a modular system, integrating multiple functional units to perform hole-making tasks on materials like titanium alloys, aluminum alloys, and composites. Key specifications include a weight target of approximately 100 kg, a hole diameter range of 4 to 8 mm, and a maximum material thickness of 15 mm. These parameters ensure compatibility with standard industrial robots and aerospace requirements. The overall architecture comprises a spindle unit, feed unit, frame unit, clamping unit, connection unit, and normal detection unit, each contributing to the end effector’s operational integrity. The workflow involves positioning by a robot, normal adjustment via sensors, clamping, drilling-countersinking, and resetting, all coordinated through a programmable logic controller (PLC). This systematic approach minimizes human intervention and maximizes repeatability.
To delve deeper, the working principle of the end effector is orchestrated in sequential phases. Initially, the robot, equipped with the end effector, moves to a theoretical hole position based on pre-input coordinate data. A laser tracker measures positional errors, and corrections are applied to align the drill tip accurately. Subsequently, laser displacement sensors assess normal direction deviations, ensuring the drill axis aligns within ±0.5° of the surface normal. Once aligned, the robot applies a clamping force to secure the workpiece, eliminating interlayer gaps. The spindle then activates, and a pneumatic cylinder drives the feed motion to complete drilling and countersinking in a single pass. Countersink depth is mechanically controlled to within ±0.05 mm. After hole-making, the system retracts and moves to the next position, iterating until all holes are processed. This workflow, illustrated in a process diagram, highlights the integration of sensing, actuation, and control within the end effector.
Designing such an end effector necessitates a holistic approach, where each unit is optimized for its specific function. In the following sections, I elaborate on the design of individual units, supported by analytical models, tables, and formulas. This modular breakdown not only clarifies the design rationale but also facilitates future modifications or scaling for different applications. The end effector’s performance is further validated through digital simulation using DELMIA software, which verifies structural integrity and collision-free motion paths. By combining theoretical design with practical simulation, this research underscores the importance of meticulous engineering in developing reliable end effectors for high-stakes industries like aerospace.
Overall Structure and Operational Framework
The end effector is conceived as a cohesive assembly mounted on a six-axis robot via a flange. Its structure is engineered to balance weight, stiffness, and functionality. The modular design allows for independent development and testing of each unit, streamlining the manufacturing and maintenance processes. Key operational requirements include normal measurement, countersink depth compensation, clamping for stability, integrated drilling-countersinking, and adjustable spindle speed with controlled feed force. These requirements are met through a combination of mechanical, pneumatic, and sensory components, all housed within a compact frame. The end effector’s workflow, as described earlier, is formalized into a control algorithm that interfaces with the robot and external measurement systems. This integration ensures seamless operation in dynamic manufacturing environments.
To quantify the design parameters, I summarize the key specifications in Table 1. This table provides a quick reference for the end effector’s capabilities, emphasizing its suitability for aerospace hole-making.
| Parameter | Value | Unit |
|---|---|---|
| Weight | ≈100 | kg |
| Hole Diameter Range | 4–8 | mm |
| Max Material Thickness | 15 | mm |
| Normal Alignment Tolerance | ±0.5 | ° |
| Countersink Depth Tolerance | ±0.05 | mm |
| Spindle Speed | Adjustable (e.g., 1000–10000) | rpm |
| Feed Force Control | Via pneumatic system | N |
| Clamping Force | Applied by robot motion | N |
The operational sequence can be mathematically modeled using kinematic equations. For instance, the positioning error correction involves coordinate transformations. Let the theoretical hole position be denoted by vector $\mathbf{P_t} = [x_t, y_t, z_t]^T$ in the robot base frame. The measured position by the laser tracker is $\mathbf{P_m} = [x_m, y_m, z_m]^T$. The error vector is:
$$\mathbf{e} = \mathbf{P_t} – \mathbf{P_m}$$
The robot adjusts the end effector’s position by $\Delta \mathbf{P} = K \mathbf{e}$, where $K$ is a gain matrix. Similarly, for normal alignment, the surface normal vector $\mathbf{n}$ is estimated from laser displacement sensor readings. If the drill axis vector is $\mathbf{d}$, the angular deviation $\theta$ is given by:
$$\theta = \cos^{-1}\left(\frac{\mathbf{d} \cdot \mathbf{n}}{\|\mathbf{d}\| \|\mathbf{n}\|}\right)$$
The robot rotates the end effector to minimize $\theta$ below 0.5°. Such mathematical formulations underpin the control logic, ensuring precision in the end effector’s operations.
Detailed Unit Design of the End Effector
Each unit of the end effector is designed with specific functions in mind. This modular approach not only simplifies the design process but also enhances the maintainability and scalability of the end effector. Below, I discuss each unit in detail, incorporating tables and formulas where applicable to summarize design choices and performance metrics.
Spindle Unit
The spindle unit is responsible for generating rotational motion and housing the cutting tool. It comprises a high-speed electric spindle, a drill-countersink tool, an HSK tool holder, and a countersink depth control mechanism. The electric spindle offers variable speed control, allowing adaptation to different materials and hole sizes. The integrated drill-countersink tool enables simultaneous drilling and countersinking, reducing cycle time. The depth control mechanism interacts with a surface inside the clamping foot to mechanically limit countersink depth, providing a fail-safe against over-countersinking.
The spindle’s rotational dynamics can be described by the torque balance equation. If $T_m$ is the motor torque, $T_c$ is the cutting torque, and $J$ is the moment of inertia, then:
$$T_m – T_c = J \frac{d\omega}{dt}$$
where $\omega$ is the angular velocity. The cutting torque depends on material properties and feed rate, often modeled empirically. For aerospace materials like titanium, the specific cutting force $k_c$ (in N/mm²) influences torque. If the drill diameter is $d$ and feed per revolution is $f$, the cutting torque $T_c$ can be approximated as:
$$T_c = \frac{k_c \cdot d^2 \cdot f}{8}$$
This relation guides the selection of spindle power and control parameters. Table 2 lists typical spindle parameters for the end effector.
| Parameter | Value | Unit |
|---|---|---|
| Max Spindle Power | 5 | kW |
| Speed Range | 1000–15000 | rpm |
| Tool Holder Type | HSK-A63 | – |
| Countersink Depth Control | Mechanical stop | mm |
| Cooling | Internal through-tool | – |
Feed Unit
The feed unit manages the linear motion of the spindle during hole-making. It uses a double-acting pneumatic cylinder to provide axial feed force, with an electrical proportional valve regulating air pressure to adjust force magnitude. A displacement sensor monitors feed travel, ensuring consistent stroke length. This design offers simplicity and reliability, with the ability to maintain steady feed force across varying material thicknesses.
The feed force $F_f$ is proportional to the pneumatic pressure $P$ and cylinder bore area $A$:
$$F_f = P \cdot A – F_{friction}$$
where $F_{friction}$ accounts for seal friction. For a cylinder diameter of 50 mm and operating pressure up to 0.6 MPa, the theoretical force ranges up to 1178 N, sufficient for drilling aerospace materials. The feed velocity $v_f$ is controlled by flow control valves, and for a constant feed, it relates to the spindle speed $\omega$ and feed per revolution $f$ as:
$$v_f = \frac{\omega \cdot f}{2\pi}$$
This unit ensures that the end effector delivers precise feed motions, critical for hole quality.
Frame Unit
The frame unit serves as the structural backbone, integrating all other units. It consists of a support frame, sliders, front and rear cover plates, and a back cover. The frame is designed using finite element analysis to maximize stiffness while minimizing weight. Materials like aluminum alloys or carbon fiber composites are considered to achieve a high strength-to-weight ratio. The frame’s natural frequency should be above the operating frequency to avoid vibrations, which could degrade hole accuracy. If $k_{frame}$ is the equivalent stiffness and $m_{frame}$ is the mass, the natural frequency $f_n$ is:
$$f_n = \frac{1}{2\pi} \sqrt{\frac{k_{frame}}{m_{frame}}}$$
A target $f_n > 100$ Hz is set to ensure dynamic stability. The frame’s layout also facilitates easy access for maintenance, aligning with the modular philosophy of the end effector.
Clamping Unit
The clamping unit stabilizes the workpiece during drilling, preventing burr formation and interlayer gaps. It includes a clamping foot (with foot head, plate, and support arms), chip removal, and cooling systems. The clamping foot is fixed to the frame, and the robot applies the clamping force by pressing the end effector against the workpiece. This non-independent feed motion simplifies the design, as shown in comparative motion diagrams. The foot head incorporates a countersink depth control surface that engages with the spindle’s depth control mechanism, providing mechanical depth limitation.
The clamping force $F_c$ must overcome any workpiece spring-back and ensure firm contact. If the robot exerts a force $F_{robot}$, and the foot contact area is $A_c$, the pressure on the workpiece is:
$$P_c = \frac{F_{robot}}{A_c}$$
This pressure should be sufficient to suppress vibrations but not damage the material. For typical aerospace skins, $F_c$ ranges from 200 to 500 N. Chip removal is achieved through vacuum suction, integrated into the foot design, keeping the work area clean and preventing recutting of chips.
Connection Unit
The connection unit interfaces the end effector with the robot. It primarily involves a flange, and the mounting style can be coaxial or suspended. After analysis, a suspended mounting is chosen for this end effector, as it offers greater accessibility for large curved surfaces like aircraft fuselages. However, this configuration imposes passive moments on the robot’s joints, which must be accounted for in trajectory planning.
The connection stiffness affects positioning accuracy. If the flange has torsional stiffness $k_t$ and the robot applies a torque $\tau$, the angular deflection $\phi$ is:
$$\phi = \frac{\tau}{k_t}$$
Minimizing $\phi$ requires a robust flange design. The suspended mounting also influences the end effector’s center of gravity, which should be close to the robot’s wrist to reduce dynamic loads. This consideration is vital for the overall stability of the hole-making system.
Normal Detection Unit
The normal detection unit ensures the drill axis aligns perpendicularly to the workpiece surface. It employs laser displacement sensors mounted at an angle (e.g., 45°) to the tool axis. By measuring distances to multiple points on the surface, the unit computes the surface normal vector. The sensor arrangement minimizes beam spread, reducing measurement errors.
Mathematically, if three laser sensors measure distances $d_1, d_2, d_3$ to points $\mathbf{p_1}, \mathbf{p_2}, \mathbf{p_3}$ in a local coordinate system, the plane equation $ax + by + cz + d = 0$ can be fitted. The normal vector $\mathbf{n} = [a, b, c]^T$ is then normalized. The alignment error $\theta$ is computed as earlier, and corrections are sent to the robot. This unit is crucial for achieving the tight normal tolerance of ±0.5°, directly impacting hole quality in curved aerospace components.
Table 3 summarizes the sensor parameters for the normal detection unit, highlighting its precision capabilities.
| Parameter | Value | Unit |
|---|---|---|
| Sensor Type | Laser displacement | – |
| Measurement Range | ±10 | mm |
| Accuracy | ±0.01 | mm |
| Mounting Angle | 45 | ° |
| Number of Sensors | 3 | – |
Simulation and Validation Using DELMIA
To validate the design of the end effector, I conducted digital simulations in DELMIA, a platform for manufacturing process emulation. The simulation environment includes the robot, end effector, workpiece, and auxiliary equipment like a mobile platform. The goal is to verify structural rationality, collision-free motion paths, and process feasibility.
The simulation process begins by setting up the layout in DELMIA. Resources such as the robot model (e.g., a six-axis industrial robot), the end effector assembly, and the workpiece are positioned in a virtual workspace. Initial states are saved to define the starting configuration. Then, a process library is created, outlining the hole-making workflow as a series of activities: positioning, normal alignment, clamping, drilling-countersinking, retraction, and moving to the next hole. Each activity is broken down into discrete motions, controlled via simulated robot commands.
For instance, the positioning activity involves linear and rotational motions to bring the end effector to a target hole location. The trajectory planning uses inverse kinematics to compute joint angles. If $\mathbf{x}_d$ is the desired end-effector pose (position and orientation), the robot joint vector $\mathbf{q}$ is solved from:
$$\mathbf{x}_d = f(\mathbf{q})$$
where $f$ is the forward kinematics function. DELMIA’s built-in solvers handle this computation, generating smooth motion paths visualized as white lines in the simulation. I iterated this for multiple holes to cover a typical aircraft panel pattern.
Interference checking is performed both statically and dynamically. Static analysis examines the end effector’s internal components for collisions in the assembled state. Dynamic analysis tracks collisions during motion sequences. The results showed no interference, confirming that the end effector’s compact design avoids internal clashes and external collisions with the workpiece or environment. This validation is crucial for ensuring safe and reliable operation in real-world settings.
Moreover, the simulation allows for cycle time estimation. By analyzing motion durations and dwell times, the overall efficiency of the hole-making process can be assessed. For example, if each hole takes $t_{hole}$ seconds, and there are $N$ holes, the total time $T_{total}$ is:
$$T_{total} = N \cdot t_{hole} + (N-1) \cdot t_{move}$$
where $t_{move}$ is the time between holes. Optimizing these parameters through simulation helps in planning production schedules. The DELMIA simulation thus serves as a virtual prototype, reducing the need for physical trials and accelerating the development of the end effector.
Conclusions and Future Perspectives
In this research, I have detailed the design and simulation of a hole-making end effector for robotic aerospace assembly. The end effector incorporates modular units for spindle actuation, feed control, clamping, normal detection, and connection, all engineered to meet stringent precision requirements. Key features include mechanical countersink depth control, integrated drilling-countersinking, and sensor-based normal alignment, which collectively enhance hole quality and process efficiency. The use of mathematical models and tables throughout the design phase ensured systematic parameter selection, while DELMIA simulations validated structural integrity and motion feasibility without collisions.
The proposed end effector demonstrates how thoughtful integration of mechanical, pneumatic, and sensory elements can yield a robust tool for automated manufacturing. Its suspended mounting offers flexibility for large-scale applications, though careful robot programming is needed to manage passive moments. Future work could focus on adaptive control algorithms that adjust feed force in real-time based on material feedback, or the incorporation of machine vision for enhanced hole positioning. Additionally, lightweight materials like composites could further reduce the end effector’s weight, enabling use with smaller robots. Overall, this study contributes a viable design framework for end effectors in precision hole-making, with potential applications beyond aerospace to industries like automotive or shipbuilding, where similar assembly challenges exist.